Home & DIY
How to Build Simple Floating Shelves
# How to Build Simple Floating Shelves Floating shelves offer a modern, minimalist solution to storage and display needs, transforming cluttered spac...
How to Build Simple Floating Shelves
Floating shelves offer a modern, minimalist solution to storage and display needs, transforming cluttered spaces into elegant showcases for books, photos, and decor. Their unique design, which conceals all mounting hardware, creates the illusion that they are magically suspended against the wall. This clean aesthetic not only enhances the visual appeal of a room but also maximizes space, making it an ideal project for anyone looking to combine functionality with sophisticated style. Whether you're a seasoned DIY enthusiast or a novice eager to take on your first woodworking project, this guide will provide you with the knowledge and confidence to build floating shelves that are both beautiful and structurally sound.
This comprehensive tutorial will walk you through every stage of the process, from initial conception to final installation. We will delve into the critical planning phase, helping you decide on the perfect dimensions and placement for your shelves. The core of this guide focuses on the most crucial aspect of a successful installation: creating a robust and invisible support system. We will demystify the process of locating wall studs, an essential step for ensuring your shelves can bear weight safely. Furthermore, we will provide an in-depth exploration of the various hardware options available, guiding you on how to choose the right brackets, screws, and anchors for your specific wall type and shelf size. By the end of this article, you will have a clear, step-by-step roadmap to construct and mount your own custom floating shelves, adding a touch of personalized craftsmanship to your home.
Section 1: Planning Your Floating Shelf Project
Before you make the first cut or drill the first hole, a well-thought-out plan is the cornerstone of a successful DIY project. Properly planning your floating shelves ensures they not only look fantastic but also fit their intended space and function perfectly. This initial phase involves considering the aesthetic you want to achieve, determining the practical requirements of the shelves, and taking precise measurements to guarantee a flawless fit.
### Defining the Purpose and Style
First, consider the primary function of your shelves. Will they be used for heavy items like a collection of hardcover books, or for displaying lightweight decorative objects? The intended load will directly influence the materials you choose and, most importantly, the type of support structure you will need to build. For heavy-duty applications, you'll need to ensure your support brackets are anchored directly into wall studs. For lighter loads, you may have more flexibility.
Next, think about the style. Floating shelves are versatile and can complement various decor themes, from rustic to ultra-modern. The type of wood, the finish, and the thickness of the shelves will define their final look. Do you prefer the warm, natural grain of oak or the clean, bright look of painted pine? A thick, chunky shelf makes a bold statement, while a slimmer profile offers a more subtle, understated elegance. Sketch out your ideas and gather inspiration from home decor magazines or websites to visualize how the shelves will integrate into your existing space.
### Measuring and Mapping Your Wall Space
Once you have a clear vision, it's time to take precise measurements. Use a tape measure to determine the ideal length and depth of your shelves. A common mistake is making shelves too deep, which can make them protrude awkwardly and become inefficient for storage. A depth of 10 to 12 inches is standard for bookshelves, while 6 to 8 inches is often sufficient for decorative displays.
Use painter's tape to outline the proposed location of the shelves on the wall. This simple trick provides a powerful visual representation of how they will look in the room. You can easily adjust the tape to test different heights and lengths until you are satisfied with the composition. This visual map also serves a practical purpose: it helps you identify potential obstructions like light switches, outlets, or thermostats, and it marks the area where you will need to perform the crucial task of locating wall studs. Taking the time for this step ensures there are no surprises during the installation phase.
Section 2: Finding Studs and Choosing the Right Hardware for Support
The "floating" magic of these shelves is entirely dependent on a hidden, robust support system. This section is the most critical part of the process. A securely mounted shelf begins with locating the structural members in your wall—the studs—and selecting hardware that can handle the intended weight. Skipping or rushing this step can lead to sagging shelves or, worse, shelves that fall off the wall.
### The Art of Finding Wall Studs
Wall studs are the vertical framing members (typically wood or metal) that make up the skeleton of your walls. Anchoring your shelf brackets directly into these studs provides the strongest possible support. Standard residential construction places studs 16 inches apart on center, though this can sometimes vary to 24 inches.
### Using a Stud Finder
The most reliable method for locating studs is to use an electronic stud finder. These handheld devices detect changes in density behind the drywall. To use one, place it flat against the wall and turn it on. Slowly slide it horizontally across the wall where you plan to install your shelf. The device will light up or beep when it detects the edge of a stud. Mark the location of both edges with a pencil. The center of the stud is the midpoint between these two marks. Repeat this process to find all the studs along the length of your planned shelf.
### Manual Methods for Locating Studs
If you don't have a stud finder, there are several manual techniques you can use. Look for visual cues on your baseboards or crown molding; the nail dimples are often a giveaway as they are fastened directly to the studs. You can also use the "tap test." Knock gently on the wall with your knuckle. The sound will be hollow between studs and will change to a solid, dull thud when you knock over a stud. Another method is to measure from a corner. Since studs are typically 16 inches on center, you can measure in increments of 16, 32, and 48 inches from a corner and check for a stud at those points.
### Selecting the Right Mounting Hardware
The hardware you choose is just as important as finding the studs. The type of bracket and fasteners will depend on the weight of the shelf and its contents, as well as the type of wall you have.
### Floating Shelf Brackets
For a true floating look, you need specialized brackets that will be concealed within the shelf. These typically consist of a flat plate that mounts to the wall and several solid steel rods that project outwards. The shelf, constructed as a hollow box, slides over these rods. When selecting a bracket, consider the "rod length" and "weight capacity." The rods should extend at least two-thirds of the way into the shelf's depth for adequate support. The manufacturer will specify the weight capacity per bracket; always err on the side of a stronger bracket than you think you might need.
### Screws and Anchors
The screws you use to attach the bracket to the wall are critical. For mounting directly into wood studs, use heavy-duty lag screws. These screws are thick and have aggressive threading that bites firmly into the wood, providing exceptional holding power. A typical recommendation is to use screws that are at least 2.5 inches long to ensure they penetrate through the drywall and deep into the stud.
If your shelf placement doesn't allow for all mounting points to hit a stud, you will need to use heavy-duty drywall anchors. Do not use standard plastic anchors, as they are not designed for heavy loads. Instead, opt for toggle bolts or molly bolts. A toggle bolt has spring-loaded wings that open up behind the drywall, distributing the load over a wider surface area. These are among the strongest types of drywall anchors and are an excellent choice for ensuring your project to build floating shelves is a secure and lasting one.
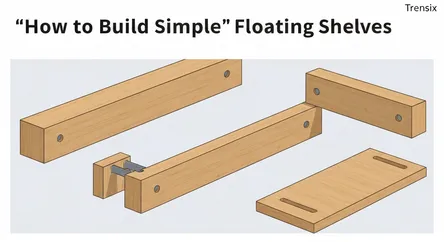
Section 3: Building the Hollow Shelf Box
With your plan in place and your hardware selected, it's time to move on to the woodworking phase: constructing the shelves themselves. The key to the floating design is to build a hollow box that will later slide over and conceal the mounting bracket. This process requires some basic woodworking skills and tools, but the result is a clean, professional-looking shelf.
### Gathering Materials and Tools
For the shelf box, you'll need wood. A common and cost-effective choice is to use 1x (one-by) lumber for the internal frame and thin plywood or MDF (medium-density fiberboard) for the top and bottom skins. For example, you could build a frame from 1x3 pine boards and skin it with 1/4-inch birch plywood for a smooth, paintable surface.
Your essential tool list will include:
- A circular saw or miter saw for making straight, accurate cuts.
- A power drill with various bits for drilling pilot holes and driving screws.
- Wood glue for creating strong joints.
- Clamps to hold pieces together while the glue dries.
- A tape measure and a pencil for marking.
- A carpenter's square to ensure your corners are 90 degrees.
- Sandpaper or a power sander for a smooth finish.
### Constructing the Internal Frame
The internal frame provides the structure for your shelf box. This frame will essentially be a ladder-like construction that fits snugly between the top and bottom panels of your shelf.
### Cutting the Frame Pieces
Begin by cutting the pieces for your frame from the 1x lumber. You will need two long pieces that match the desired length of your shelf. These will be the front and back rails of the frame. Then, cut several shorter pieces to act as the internal "rungs" or cleats. These should be cut to a length that equals your desired shelf depth minus the thickness of the front and back rails. For example, for a 10-inch deep shelf using 1x3 lumber (which is 0.75 inches thick), your cleats would be 10 - (0.75 + 0.75) = 8.5 inches long. Space these cleats every 12-16 inches along the length of the frame for rigidity.
### Assembling the Frame
Lay the front and back rails on a flat surface. Apply a thin layer of wood glue to the ends of each cleat and position them between the rails. Use your carpenter's square to ensure each joint is perfectly square. Once everything is aligned, use your drill to drive screws through the rails and into the ends of the cleats to secure the frame. It's a good practice to drill pilot holes first to prevent the wood from splitting.
### Skinning the Shelf
With the frame built, the next step is to attach the top and bottom panels, which will create the hollow box.
### Cutting the Plywood or MDF
Measure the exact dimensions of your assembled frame and cut the top and bottom panels from your 1/4-inch plywood or MDF to match. Precision is key here for a seamless look.
### Attaching the Panels
Apply a generous amount of wood glue to the top edges of the frame. Carefully place the top panel onto the frame, ensuring all edges are flush. Use brad nails or finish nails every 6-8 inches along the perimeter and along the central cleats to secure the panel while the glue dries. Flip the shelf over and repeat the process for the bottom panel. The back of the shelf box remains open; this is the opening that will slide over the wall-mounted bracket. Once assembled, let the glue cure completely according to the manufacturer's instructions.
Section 4: Finishing and Installing Your Floating Shelves
The final stage brings all your hard work together. This is where you'll finish the shelf to match your decor and then securely mount it to the wall. Attention to detail during installation is crucial for achieving that perfect, professional floating effect.
### Preparing the Shelf for Finishing
A great finish starts with proper preparation. Fill any nail holes or small gaps with wood filler and allow it to dry completely. Once dry, sand the entire surface of the shelf box. Start with a medium-grit sandpaper (around 120-grit) to smooth out any rough spots and level the wood filler. Then, move to a finer grit (around 220-grit) to create a perfectly smooth surface ready for paint, stain, or a clear coat. Be sure to wipe away all the sanding dust with a tack cloth or a damp rag before applying any finish.
### Applying Your Chosen Finish
The finish you choose will define the final look of your project to build floating shelves.
### Painting the Shelves
If you're painting, start with a coat of primer. Primer helps seal the wood and ensures even paint adhesion, especially on MDF. Apply one to two coats of primer, lightly sanding between coats. Once the primer is dry, apply your chosen paint color. Use long, even strokes with a high-quality brush or a small roller for a smooth, streak-free finish. Two coats of paint are usually sufficient for full coverage.
### Staining and Sealing
If you've used a nice hardwood plywood and want to showcase the natural wood grain, staining is an excellent option. Apply the stain according to the product's directions, wiping away any excess. After the stain has dried, you must apply a protective topcoat like polyurethane or lacquer. This will protect the wood from moisture and wear. Apply two to three coats, sanding lightly with very fine-grit sandpaper between coats for a durable, professional finish.
### Mounting the Bracket and Shelf
This is the moment of truth. A precise and level installation is key.
### Installing the Support Bracket
Take the floating shelf bracket you selected earlier and hold it against the wall at your desired height. Use a level to ensure the bracket is perfectly horizontal. Use your pencil to mark the locations of the mounting holes on the wall, making sure as many as possible align with the stud locations you found earlier.
Drill pilot holes at your marked locations. If you're drilling into a stud, the pilot hole should be slightly smaller than the diameter of your lag screw. If you are mounting into drywall, you will need to install your toggle bolts or other heavy-duty anchors at this point. Secure the bracket to the wall by driving the lag screws firmly into the studs. Double-check that the bracket is level one last time before fully tightening the screws. It should feel completely solid with no wobble.
### Sliding the Shelf On
Once the bracket is securely mounted to the wall, all that's left is to slide your finished shelf box over the support rods. The fit should be snug. If it's a bit tight, you may need to slightly ream out the holes inside the shelf's cleats. Push the shelf all the way back until its back edges are flush against the wall. To secure the shelf and prevent it from sliding off the bracket, you can drive a few small finish nails or screws through the top or bottom of the shelf down into the internal wooden frame of the support bracket itself.
Conclusion
Congratulations, you have successfully completed your project to build floating shelves from scratch. By following this detailed guide, you have not only created a beautiful and functional storage solution but have also gained valuable DIY skills. You've learned how to plan a project with precision, how to master the crucial task of finding wall studs for robust support, and how to select the appropriate hardware to ensure your shelves are safe and secure. From constructing the hollow shelf boxes to applying a professional finish and executing a flawless installation, you have transformed raw materials into a stylish and personalized addition to your home. These new shelves stand as a testament to your capability and craftsmanship, offering a clean, modern aesthetic that will enhance your space for years to come. Enjoy the satisfaction of your work and the new, organized look of your room.