Home & DIY
How to Build a Raised Garden Bed
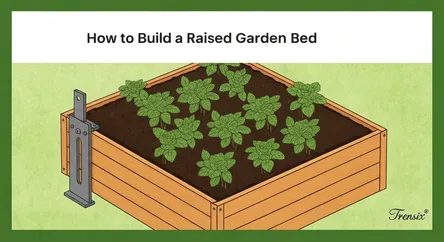
# How to Build a Raised Garden Bed: A Simple DIY Guide Raised bed gardening is a fantastic way to cultivate a thriving garden, whether you're working...
How to Build a Raised Garden Bed: A Simple DIY Guide
Raised bed gardening is a fantastic way to cultivate a thriving garden, whether you're working with a small urban patio or a sprawling backyard. Building your own raised garden bed is a rewarding and straightforward DIY project that gives you complete control over your soil, improves drainage, and can even save your back from the strain of bending over. This comprehensive guide will walk you through everything you need to know to build a garden bed from scratch using simple plans, basic lumber, and screws. We’ll cover everything from selecting the right materials and tools to the step-by-step construction process and filling your new bed with the perfect soil mix. This project is perfect for beginners and seasoned DIYers alike, providing a durable and functional structure that will serve your gardening ambitions for years to come. By the end of this tutorial, you will have the confidence and knowledge to construct a beautiful, custom-sized raised garden bed, creating the ideal environment for your vegetables, herbs, or flowers to flourish. Get ready to transform your outdoor space and enjoy the many benefits of a home-built garden feature.
Section 1: Planning and Preparation for Your Raised Garden Bed
Before a single piece of wood is cut, a little planning goes a long way toward ensuring your project to build a garden bed is a complete success. Thoughtful preparation will save you time, prevent mistakes, and result in a garden bed that perfectly suits your space and gardening needs. This initial phase involves choosing the ideal location, determining the right size and dimensions for your plants, and gathering all the necessary tools and materials. Taking the time to map out these details ensures a smooth construction process and a final product that is both functional and aesthetically pleasing. A well-planned garden bed will maximize sunlight exposure for your plants, provide easy access for planting and harvesting, and integrate seamlessly into your existing landscape.
Choosing the Perfect Location
The success of your garden heavily depends on its location. Most vegetables and many flowering plants require at least six to eight hours of direct sunlight per day. Observe your yard throughout the day to identify a spot that receives ample sun. Consider the path of the sun as the seasons change; a spot that's sunny in late spring might be shadier in the fall. You also want a location with good drainage. Avoid low-lying areas where water tends to collect after heavy rain, as this can lead to waterlogged soil and root rot, even in a raised bed. Proximity to a water source is another key consideration. You’ll be watering your garden regularly, so placing your bed near a hose spigot will make this task much more convenient. Finally, think about accessibility. You'll need space to move around the bed with a wheelbarrow for filling it with soil and easy access for weeding, planting, and harvesting.
Determining the Ideal Size and Depth
The beauty of a DIY project is that you can customize the dimensions to fit your specific needs. However, there are some standard guidelines to consider when you build a garden bed.
Width and Length
A common mistake is making the bed too wide. You should be able to comfortably reach the center of the bed from either side without stepping into it, which would compact the soil. A maximum width of 4 feet (about 1.2 meters) is recommended. If the bed is against a wall or fence, a width of 2 to 3 feet is more appropriate. The length can be whatever you desire and what your space allows. Common lengths are 8 or 12 feet, which work well with standard lumber sizes and minimize waste.
Depth
The depth of your raised bed is crucial for healthy root development. A minimum depth of 12 inches is recommended for most plants, including many vegetables like lettuce, spinach, and herbs. If you plan to grow root vegetables like carrots, potatoes, or parsnips, a deeper bed of 18 to 24 inches is ideal. A deeper bed holds more soil, which means it retains moisture better and provides more room for root systems to expand, leading to healthier, more productive plants. When building on top of existing hard-packed or poor-quality soil, a deeper bed ensures your plants have plenty of nutrient-rich soil to grow in.
Section 2: Selecting Materials and Tools
With your plan in place, the next step is to gather the materials and tools required for the job. Choosing the right lumber is the most critical decision, as it will determine the longevity and safety of your garden bed. Equally important is having the correct tools on hand, which will make the assembly process safer, faster, and more precise. This section will guide you through selecting the best wood for your project and provide a comprehensive checklist of the tools and hardware you’ll need to build your garden bed successfully.
Choosing the Right Lumber
The type of wood you select will impact the durability and lifespan of your raised bed. You want a wood that is naturally resistant to rot and decay, as it will be in constant contact with damp soil.
Recommended Wood Types
- Cedar and Redwood: These are the premier choices for building garden beds. Both are naturally resistant to rot and insects, meaning they will last for many years (10-20 years is common) without needing chemical treatments. They are more expensive than other options, but their longevity can make them a worthwhile investment.
- Douglas Fir and Pine: These are more budget-friendly options. However, they are not naturally rot-resistant and will have a shorter lifespan, typically 3-7 years. If you choose pine, select a thicker board (e.g., 2-inch thickness) to extend its life. You can also find "ground-contact" rated lumber, but be aware of the treatment methods.
- Composite or Recycled Plastic Lumber: For those seeking an ultra-durable, maintenance-free option, composite or plastic lumber is an excellent choice. It will not rot, warp, or splinter and can last for decades. The upfront cost is higher, but it's a long-term solution.
Wood to Avoid: Pressure-Treated Lumber
It is crucial to be cautious about using modern pressure-treated wood. While older versions containing Chromated Copper Arsenate (CCA) were highly toxic and have been phased out for residential use, newer treatments like Alkaline Copper Quaternary (ACQ) and Copper Azole (CA) are considered safer. However, some gardeners still prefer to avoid them for edible gardens to eliminate any risk of chemicals leaching into the soil. If you do use pressure-treated wood, consider lining the inside of the bed with a heavy-duty, food-grade plastic liner as a barrier. Also, never use old railroad ties, as they are treated with creosote, a toxic substance.
Essential Tools and Hardware Checklist
Having all your tools and hardware organized before you start will streamline the construction process. For this simple design, you won't need an elaborate workshop, just some basic DIY tools.
Tools List:
- Measuring Tape: For accurate measurements of your lumber.
- Pencil: For marking your cut lines.
- Speed Square or Carpenter's Square: To ensure your corners are perfectly 90 degrees.
- Circular Saw or Miter Saw: For making clean, straight cuts in your lumber. A miter saw is ideal for perfect 90-degree cuts, but a circular saw with a guide will also work well. A handsaw can be used but will require more effort.
- Power Drill/Driver: An essential tool for drilling pilot holes and driving screws.
- Drill Bits: A bit slightly smaller than your screw diameter for pilot holes.
- Level: To ensure your bed is level on the ground before filling it.
- Clamps: To hold boards in place while you drill and screw.
Hardware List:
- Lumber: Based on the dimensions you planned. For this guide, we'll design a 4'x8' bed that is 12" deep using 2"x6" boards. You will need six 8-foot-long 2"x6" boards.
- Screws: Use exterior-grade screws designed for outdoor use to prevent rusting. 3-inch long deck screws are an excellent choice for joining 2-inch thick lumber. You will need approximately 24-30 screws for a 4'x8' bed.
- 4x4 Post (Optional): For reinforcing the corners. You can cut a 4x4 post into corner brace pieces that are the same height as your bed. This adds significant strength and longevity. You will need one 4-foot long 4x4 post.
Section 3: Step-by-Step Construction Guide
Now we get to the exciting part: assembling your raised garden bed. This section provides a clear, step-by-step process to build a garden bed that is sturdy and square. We will be building a standard 4-foot by 8-foot bed that is approximately 11 inches deep using 2x6 lumber. This design is simple, strong, and efficient with material usage. Following these instructions carefully will ensure you create a professional-looking and durable structure for your garden. Remember to always wear safety glasses when cutting or drilling wood.
Step 1: Cutting Your Lumber
Accuracy in this first step is key to a successful build. If you planned a different size, adjust your measurements accordingly. For our 4'x8' bed, you don't need to cut the 8-foot boards, but you will need to cut two of them in half to create the shorter sides.
Making the Cuts
- Measure and Mark the Side Pieces: Take two of your 8-foot 2x6 boards. Using your measuring tape, measure and mark the exact center point, which is 4 feet (48 inches). Use your speed square to draw a straight, clear line across the board at your mark. This will guide your cut.
- Cut the Boards: Using your circular saw or miter saw, carefully cut along the lines you marked. You should now have four pieces of lumber that are each 4 feet long. These will form the short sides of your raised bed.
- Cut the Corner Braces (Optional but Recommended): For added strength, cut a 4x4 post into four equal pieces, each 11 inches long (the height of two stacked 2x6 boards). These will serve as internal corner braces that you'll screw the side boards into, creating a very strong joint.
You should now have the following pieces:
- Four 8-foot long 2x6 boards (for the long sides)
- Four 4-foot long 2x6 boards (for the short sides)
- Four 11-inch long 4x4 posts (for the corner braces)
Step 2: Assembling the First Layer
The easiest way to assemble the bed is one layer at a time on a flat surface like a driveway or garage floor. This helps ensure everything is square before you move it into its final position.
Building the Base Frame
- Lay Out the Frame: Place two 8-foot boards and two 4-foot boards on the ground in a rectangle, with the shorter boards inside the longer boards.
- Position the Corner Braces: Place one of the 4x4 corner braces inside one of the corners, ensuring it is flush with the top and side edges of the 2x6 boards.
- Drill Pilot Holes: To prevent the wood from splitting, drill pilot holes before driving the screws. Drill two pilot holes through the 8-foot board and into the corner brace. Then, drill two pilot holes through the 4-foot board and into the same corner brace.
- Secure the Corner: Drive 3-inch exterior screws through your pilot holes to firmly attach the boards to the corner brace.
- Repeat for All Corners: Repeat this process for the remaining three corners. Once completed, you will have a sturdy rectangular frame that forms the bottom layer of your raised bed. Use your speed square to check that all corners are at a 90-degree angle.
Step 3: Assembling the Second Layer and Finishing
With the first layer complete, adding the second is straightforward. This will bring your bed to its full height and provide the necessary depth for your plants.
Stacking and Securing
- Position the Second Layer: Place the remaining two 8-foot boards and two 4-foot boards directly on top of the first layer, ensuring the edges are perfectly aligned.
- Drill and Screw: Just as you did with the first layer, drill pilot holes and drive screws through the boards into the 4x4 corner braces. Use two screws per board at each corner. This will securely join the top layer to the bottom layer and the corner posts.
- Add Mid-Point Supports (for 8-foot beds): On an 8-foot long bed, the long sides can bow outwards over time due to the pressure of the soil. To prevent this, it's a good idea to add a support brace in the middle. You can do this by cutting a piece of scrap 2x6 to fit vertically between the two long sides in the center of the bed and screwing it into place. Alternatively, a simple stake driven into the ground on the outside of the bed at the midpoint can also provide support.
Your raised garden bed structure is now fully assembled! It should be a strong, rigid box ready to be moved into its final location.
Section 4: Installation and Filling Your Garden Bed
With the construction complete, the final steps involve preparing the site, positioning your new raised bed, and filling it with a high-quality growing medium. Proper installation and the right soil mix are just as important as the build itself for ensuring a healthy and productive garden. This section will guide you through the process of preparing the ground, weed-proofing your bed, and creating the perfect soil blend to give your plants the best possible start.
Preparing the Site and Positioning the Bed
Before you move your bed into place, you need to prepare the ground beneath it.
Leveling the Ground
- Clear the Area: Remove any grass, weeds, rocks, or debris from the spot where your raised bed will sit.
- Level the Surface: It is very important that the bed sits level on the ground. Use a flat shovel or a rake to even out the surface. Place the empty bed frame in its final position and use a level on the top edges to check for levelness. Add or remove soil under the frame as needed until it sits perfectly level in all directions. A level bed ensures even water distribution throughout the soil.
Weed Prevention
To prevent weeds and grass from growing up into your garden bed from the soil below, you should lay down a weed barrier.
- Cardboard or Newspaper: This is the most popular and eco-friendly method. Lay down a thick layer (5-6 sheets) of plain cardboard or newspaper on the ground inside the frame. Overlap the edges generously to block any sunlight. This layer will smother any existing grass and weeds and will naturally decompose over time, adding organic matter to your soil. Avoid glossy, colored paper or cardboard with heavy inks.
- Landscape Fabric: You can also use commercial-grade landscape fabric. While it's not biodegradable, it is highly effective at blocking weeds while still allowing water to drain through.
Creating the Perfect Soil Mix
Simply filling your raised bed with soil from your yard is not ideal. Garden soil is often heavy, full of clay, and may contain weed seeds and pests. The key advantage of a raised bed is the ability to create a custom, nutrient-rich, and well-draining soil mix from scratch.
The Ideal Soil Recipe
A common and highly effective recipe for raised bed soil is a three-part mixture, often referred to as "Mel's Mix" from square foot gardening. This provides a balance of structure, nutrients, and moisture retention.
- One-Third Compost: This is the most important ingredient. Compost is rich in nutrients and beneficial microorganisms that feed your plants. Use well-rotted compost from a variety of sources if possible (e.g., mushroom compost, cow manure compost, and your own homemade compost).
- One-Third Peat Moss or Coconut Coir: Peat moss helps the soil retain moisture and keeps it light and airy. Coconut coir is a more sustainable alternative to peat moss and performs the same function. It helps to keep the soil from becoming compacted.
- One-Third Coarse Vermiculite or Perlite: Vermiculite and perlite are lightweight, sterile soil amendments that improve aeration and drainage. This ensures that your plant roots get enough oxygen and don't become waterlogged.
Mixing and Filling
You can buy these components in bags from any garden center. For a 4'x8'x11" bed, you will need approximately 1 cubic yard (or 27 cubic feet) of soil mix. To mix, you can either layer the ingredients directly in the bed and then mix them together with a shovel or garden fork, or you can mix smaller batches in a wheelbarrow or on a tarp before adding it to the bed. Fill the bed to within an inch or two of the top. Water the soil thoroughly and let it settle for a day or two before planting. You may need to top it off with a little more soil mix after it settles.
Conclusion
Congratulations, you have successfully planned, built, and installed your very own raised garden bed! By following this guide, you have not only created a durable and functional structure for your plants but also gained valuable DIY skills. This project provides you with complete control over your gardening environment, from the quality of the soil to improved drainage and easier access for planting and care. You now have the perfect foundation to grow a bountiful harvest of vegetables, a fragrant collection of herbs, or a stunning display of flowers. Remember that the key to success was in the careful planning of location and size, the selection of appropriate materials, and the precise, step-by-step construction. Your new raised garden bed is more than just a wooden box; it's an investment in your garden's future, promising years of productivity and enjoyment. Now, the real fun begins – it's time to get planting and watch your garden thrive.