Home & DIY
How to Build a DIY Fire Pit
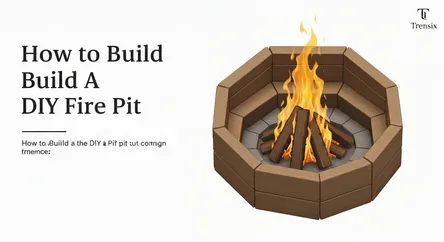
# How to Build a DIY Fire Pit: The Complete Guide A backyard fire pit is more than just a source of warmth; it’s a natural gathering place for family...
How to Build a DIY Fire Pit: The Complete Guide
A backyard fire pit is more than just a source of warmth; it’s a natural gathering place for family and friends, a focal point for your outdoor living space, and the heart of countless memories waiting to be made. From roasting marshmallows on a summer evening to sharing stories under the stars on a crisp autumn night, a fire pit transforms any backyard into a cozy and inviting retreat. While custom-built, professionally installed fire pits can cost a small fortune, the satisfaction and savings of building your own are immense. The good news is that you don't need to be a master stonemason to create a stunning and durable feature for your home. This guide is designed to walk you through every step of the process, specifically focusing on how to build a fire pit using simple, widely available retaining wall blocks.
This project is the perfect entry point for any DIY enthusiast looking to make a significant impact on their outdoor space with minimal complexity. We will demystify the process, breaking it down into manageable stages, from initial planning and design to the final, triumphant lighting of your first fire. You will learn how to choose the right location, ensuring both safety and ambiance. We will cover the essential tools and materials you'll need, with a special focus on selecting the correct type of retaining wall blocks and other components that guarantee a long-lasting and safe structure. The core of this guide is a detailed, step-by-step construction plan that will empower you to lay a proper foundation, stack your blocks for maximum stability, and install a fire-safe interior ring. Finally, we'll discuss crucial safety protocols, finishing touches, and ongoing maintenance to ensure your DIY fire pit provides years of enjoyment. Prepare to get your hands dirty and create a beautiful, functional centerpiece for your backyard.
Section 1: Planning Your DIY Fire Pit
Before you buy a single block or lift a shovel, a thoughtful planning phase is essential to ensure your project is a success. Proper planning guarantees your fire pit will not only look great but will also be safe, functional, and perfectly suited to your backyard environment. This initial stage involves considering local regulations, choosing the ideal location, and settling on a specific design and size that meets your needs. Taking the time to map out these details will save you significant time, money, and potential headaches down the line, and is the most critical first step when you decide to build a fire pit.
Checking Local Codes and Regulations
The very first thing you must do is check with your local authorities regarding fire pit regulations. This is a non-negotiable step for safety and legal compliance. Many municipalities, homeowners' associations (HOAs), and even insurance providers have specific rules governing the construction and use of outdoor fire features.
Key Regulations to Investigate:
- Permits: Determine if a construction permit is required for a permanent structure like a fire pit in your area.
- Location Restrictions: Most codes will specify a minimum distance the fire pit must be from your house, sheds, fences, property lines, and any overhanging trees or structures. A common rule is at least 10 to 25 feet away from any combustible surface.
- Burn Bans: Be aware of any seasonal or permanent burn bans in your region, which are common in areas prone to wildfires.
- Size and Type: Some jurisdictions may have restrictions on the maximum size (diameter and height) of the fire pit or the types of fuel you are allowed to burn (e.g., wood only, no yard waste).
Contact your local fire department or municipal planning/building code office to get the specific details for your address. A quick phone call or visit to their website can provide all the information you need.
Choosing the Perfect Location
With regulations in mind, you can now select the ideal spot in your yard. The location impacts not just safety, but also the overall usability and enjoyment of your fire pit.
Factors to Consider for Placement:
- Safety First: The location must adhere to the clearance requirements you identified. The ground should be level and clear of any flammable materials like dry grass, leaves, or mulch. Avoid placing it directly under low-hanging branches or power lines.
- Wind Direction: Consider the prevailing wind direction in your yard. Position the fire pit so that smoke will typically blow away from your home and any outdoor seating areas or your neighbors' properties.
- Proximity to Your Home: You want it far enough away to be safe, but close enough to be convenient. A spot that is easily accessible from your patio or back door will see much more use.
- Ambiance and View: Think about the setting. Do you want the fire pit to be a central feature on a patio, or a more rustic, secluded destination in a corner of your yard? Consider the view from the fire pit and the view of the fire pit from your house.
Once you think you have the perfect spot, use a garden hose or some spray paint to mark out the circle for your proposed fire pit. Leave it for a day or two and walk around it at different times to ensure you're happy with the placement and flow of traffic around it.
Designing Your Fire Pit and Determining Size
Now it’s time for the fun part: designing the look. Using retaining wall blocks offers a straightforward, modular approach that is highly customizable.
Design Elements:
- Shape: While a circular fire pit is the most common and classic design, you can also easily create a square or rectangular pit with retaining wall blocks.
- Size: The diameter of your fire pit is a key decision. A pit with an inside diameter of 30 to 40 inches is a popular choice, providing enough space for a healthy fire while allowing everyone seated around it to feel the warmth and engage in conversation.
- Height: A comfortable height is typically between 12 and 18 inches, which is about the same height as a coffee table or bench seating. This usually equates to three to four layers of standard retaining wall blocks. This height makes it easy to prop your feet up and is low enough not to obstruct views.
To finalize your size, arrange your seating (Adirondack chairs, benches) around the marked-out area to get a real-world feel for the space required. This will help you visualize the final setup and confirm that your chosen dimensions are appropriate for your entertaining needs.
Section 2: Gathering Materials and Tools
With your plan finalized, the next step is to acquire all the necessary materials and tools. Having everything on-site and ready to go before you begin construction will make the process smoother and more efficient. This section will provide a comprehensive checklist and detailed guidance on selecting the right components, particularly the retaining wall blocks and the crucial inner ring, to ensure you build a fire pit that is both beautiful and built to last.
Essential Materials Checklist
The beauty of this project lies in its simplicity. The materials are readily available at any major home improvement or landscape supply store. The quantities will depend on the diameter and height you decided on in the planning phase.
For the Fire Pit Structure:
- Retaining Wall Blocks: These are the centerpiece of your project. Choose concrete blocks with a trapezoidal shape, as they are designed to form clean, tight circles. Avoid standard rectangular blocks, which will leave large, unattractive gaps. When selecting blocks, ensure they are made from dense, fire-resistant concrete and not a lightweight or decorative aggregate that could crack or explode under high heat. To calculate the number of blocks needed, lay out the first ring in your desired diameter and count how many it takes. Then, multiply that number by the number of layers (courses) you plan to build (typically 3 or 4).
- Steel Fire Pit Ring/Insert: This is a critical safety component. A heavy-gauge steel ring (available in various diameters) sits inside the block structure. It protects the concrete blocks from direct, intense heat, which prevents them from drying out, cracking, and degrading over time. Match the ring's diameter to the inside diameter of your block circle.
- Construction Adhesive: You will need several tubes of heavy-duty, heat-resistant construction adhesive specifically rated for landscaping blocks or masonry. This is used to secure the layers of blocks to one another, providing essential stability.
- Paver Base or Crushed Gravel: This will form the foundation of your fire pit, ensuring proper drainage and a level base. You'll need enough to create a layer that's 4-6 inches deep.
- Sand: A small amount of all-purpose sand can be used for the final leveling of the base layer.
For the Base and Interior:
- Lava Rocks or Fire Brick: The bottom of your fire pit needs a layer of material to insulate the ground and elevate the fire. Lava rocks are porous and excellent at distributing heat. Alternatively, you can line the bottom with fire-rated bricks (fire brick or refractory brick) for maximum durability. Do not use regular river rocks, pea gravel, or other non-porous stones, as they can trap moisture and potentially explode when heated.
Required Tools for the Job
You don't need a professional workshop to complete this project. Most of these tools are common household or garden items.
Tools List:
- Shovel and Spade: For digging out the foundation. A flat-head spade is useful for creating clean edges.
- Wheelbarrow: Essential for moving gravel, blocks, and excavated soil.
- Tamper: A hand tamper is crucial for compacting the gravel base to create a solid, stable foundation.
- Level: A 2-foot or 4-foot carpenter's level is necessary for ensuring both the foundation and each course of blocks are perfectly level.
- Tape Measure: For accurately marking out your dimensions.
- Rubber Mallet: Used to gently tap the blocks into place without damaging them.
- Caulking Gun: For applying the construction adhesive.
- Work Gloves: To protect your hands from blisters and abrasion.
- Safety Glasses: To protect your eyes from dust and debris.
- Marking Paint or String and Stakes: To accurately outline the circle for your fire pit.
By taking the time to gather all these items before you start, you'll be able to work uninterrupted and focus on building a high-quality, safe, and impressive fire pit.
Section 3: Step-by-Step Construction Guide
This is where your planning and preparation come to life. Follow these steps carefully, and you'll have a sturdy, professional-looking fire pit by the end of the day. The key to a successful build is a solid, level foundation. Do not rush this part of the process, as it is the most critical element for the longevity and stability of your entire structure.
Step 1: Preparing the Foundation
A solid foundation prevents your fire pit from shifting, settling, or becoming unlevel over time. This involves excavating the area and laying a compacted gravel base.
Excavating the Base:
- Mark Your Circle: Using your steel ring or a stake and string as a guide, use marking paint to draw the outer circle of your fire pit on the ground. This line represents where the outside edge of your blocks will be.
- Dig the Trench: Begin digging out the sod and soil within the marked circle. You want to create a trench that is about 6-8 inches deep. The goal is to remove all the organic topsoil and get down to more stable subsoil. Ensure the bottom of the trench is as flat and level as possible.
- Check for Level: Use your carpenter's level to check the bottom of the excavated area. Scrape away high spots and fill in low spots to get it reasonably level.
Laying the Gravel Base:
- Add the Gravel: Start filling the trench with your paver base or crushed gravel. Add a 2-inch layer and spread it evenly with a rake.
- Compact the Layer: Use your hand tamper to firmly compact the entire gravel layer. This is a crucial step to prevent future settling.
- Repeat and Level: Continue adding gravel in 2-inch layers, tamping thoroughly after each one, until you have a compacted base that is about 4-6 inches deep. The top of your gravel base should be slightly below ground level.
- Final Leveling: Place your level across the gravel base in multiple directions (like spokes on a wheel) to check for level. Add or remove small amounts of gravel and use the tamper to create a perfectly flat and level surface. This painstaking work now will make laying the blocks infinitely easier.
Step 2: Laying the Block Courses
With the foundation set, you can now begin to build the fire pit walls. The process is a simple matter of stacking and securing the blocks layer by layer.
The First Course is Key:
- Dry Fit the First Layer: Place your first layer of retaining wall blocks directly on the compacted gravel base. Arrange them in a circle, ensuring the back edges are tight against each other. The trapezoidal shape of the blocks should naturally form a clean circle.
- Level the First Course: This is your last chance to ensure everything is perfect. Place your level across the top of the blocks, spanning opposite sides of the circle. Use your rubber mallet to gently tap down any high blocks until the entire ring is perfectly level. Check in multiple directions. If a block is too low, you can add a small amount of sand or paver base underneath it to raise it. A level first course is non-negotiable for a stable wall.
Stacking and Securing Subsequent Courses:
- Apply Construction Adhesive: Once the first course is perfect, remove one block at a time, apply a generous zigzag bead of construction adhesive to the top of it, and place the next block for the second course on top. Stagger the joints in a classic brick-like pattern for maximum strength and a professional look. This means the center of each block on the second course should sit over the seam between two blocks on the first course.
- Build Upwards: Continue this process, laying the second course and checking for level as you go. Tap blocks gently with the rubber mallet to seat them firmly. Once the second course is complete, repeat the process by applying adhesive to the top of the second course and laying the third, again staggering the joints.
- Final Height: Continue adding courses until you reach your desired height (typically 3 or 4 courses). Constantly check that the walls are plumb (vertically straight) and level.
Step 3: Installing the Insert and Finishing Touches
The final steps involve placing the protective steel ring and filling the interior of the pit.
Placing the Steel Ring:
- Insert the Ring: Carefully lower the steel fire pit ring into the center of your block structure. It should fit snugly against the inside walls of your pit. The top lip of the ring should sit flush with or slightly above the top course of your blocks.
- Backfill the Gap (Optional): If there is a small gap between the steel insert and the blocks, you can fill it with a bit of sand or fine gravel for a tighter fit.
Filling the Bottom of the Pit:
- Add Drainage: Before adding your final material, it's wise to ensure good drainage. Some builders will leave small gaps (weep holes) in the first course of blocks by omitting adhesive at a few seams to let water escape.
- Lay Your Base Material: Fill the bottom of the pit, inside the steel ring, with 2-4 inches of lava rock or by arranging a layer of fire bricks. This creates a durable floor, elevates the wood for better airflow, and protects the ground beneath the pit from scorching. Your DIY fire pit is now structurally complete. Allow the construction adhesive to cure for the manufacturer's recommended time (usually 24-48 hours) before lighting your first fire.
Section 4: Safety, Curing, and Maintenance
Congratulations, you have successfully managed to build a fire pit! However, the project isn't truly finished until you understand how to use and maintain it safely. A fire pit can be a source of immense enjoyment, but it also carries inherent risks. Adhering to proper safety protocols, allowing your materials to cure correctly, and performing regular maintenance will ensure your fire pit remains a safe and beautiful backyard feature for many years to come.
Curing and The First Fire
Before you send out invitations for a s'mores party, you need to properly cure both the construction adhesive and the materials themselves. This critical step ensures the long-term integrity of your structure.
Curing the Adhesive and Blocks:
- Adhesive Curing Time: First and foremost, check the manufacturer's instructions on the tube of construction adhesive. Most high-strength masonry adhesives require at least 24 to 48 hours to fully cure and develop maximum bond strength. Some may require up to 7 days. Do not light a fire before this period is over, as the heat could compromise the bond.
- The Initial Curing Fire: Your first fire should be a small, controlled one. The goal is to gradually introduce heat to the concrete blocks and the steel ring. This process helps to drive out any residual moisture trapped within the materials. Start with a small amount of kindling and a few small logs. Keep this first fire modest in size and duration—let it burn for about an hour. A large, roaring bonfire right away can cause thermal shock, potentially leading to cracks in the blocks.
Essential Fire Pit Safety Rules
Treat your fire pit with the same respect you would any open flame. Establishing clear rules for your family and guests is paramount.
Always-On Safety Practices:
- Check Conditions: Before lighting a fire, always check the local weather forecast. Never use your fire pit on excessively windy days, as embers can travel and ignite dry leaves, grass, or nearby structures.
- Supervision is Key: Never leave a fire unattended, even for a moment. An adult should be present and supervising the fire from the moment it is lit until it is completely extinguished. Keep a close watch on children and pets, establishing a "no-play zone" around the pit.
- Use the Right Fuel: Only burn clean, dry, seasoned hardwoods like oak, hickory, or ash. These woods burn hotter, cleaner, and produce less smoke and sparks than softwoods like pine. Never burn treated lumber, plywood, painted wood, trash, or yard waste, as these can release toxic fumes.
- Fire Extinguishing Tools: Always have a fire extinguisher, a garden hose with a spray nozzle, or at least a large bucket of water or sand nearby before you light the fire. Make sure everyone knows where these safety tools are located.
- Extinguishing a Fire Properly: When you are finished for the night, you must ensure the fire is completely out. Do not just let it smolder. Douse the embers and ashes with water, stirring them with a poker or shovel to ensure all hot spots are extinguished. Continue adding water until all hissing and steaming stops. The ashes should be cool to the touch before you leave the area.
Long-Term Maintenance
With proper care, your retaining wall block fire pit will last for decades. The maintenance is minimal but important.
Regular Upkeep Checklist:
- Clean Out Ashes: Regularly remove ashes from the pit. A thick layer of ash can absorb and hold moisture, which can accelerate corrosion of your steel ring and keep the bottom of your pit damp. Use a small shovel to scoop out the cold ashes into a metal bucket.
- Inspect the Structure: At the beginning of each season, give your fire pit a thorough inspection. Check the blocks for any significant cracks or shifting. Ensure the adhesive is still holding strong. Minor cracks in concrete are often cosmetic, but larger structural cracks may require attention.
- Weed and Debris Removal: Keep the area immediately surrounding your fire pit clear of weeds, dry leaves, and other flammable debris. This creates a safer "defensible space" around the pit.
By integrating these safety and maintenance practices into your routine, you can relax and fully enjoy the wonderful ambiance and warmth that your new DIY fire pit brings to your home.
Conclusion
Building your own DIY fire pit from retaining wall blocks is a profoundly rewarding project that adds immense value, warmth, and a central gathering point to your outdoor living space. By following this comprehensive guide, you have seen how a project that might seem intimidating can be broken down into a series of clear, manageable steps. From the critical initial planning phase of checking local codes and selecting the perfect location, to the hands-on work of laying a solid foundation and stacking the blocks, you now possess the knowledge to confidently build a fire pit that is safe, durable, and professionally finished. The key to success lies in patience and precision, especially when creating a perfectly level base—the literal foundation of your entire project.
You’ve learned the importance of selecting the right materials, from fire-rated concrete blocks to the essential steel ring insert that protects your investment from the intense heat. The step-by-step construction process, including the proper application of construction adhesive and the staggered-joint technique, ensures a stable and long-lasting structure. Most importantly, you are now equipped with the crucial safety knowledge required to operate and maintain your fire pit responsibly, ensuring it remains a source of enjoyment and not a hazard.
Now, all that's left is to sit back, relax, and enjoy the fruits of your labor. The crackle of the fire, the warmth on your face, and the circle of friends and family gathered around are the true rewards. You haven't just built a structure of block and stone; you've created an engine for memories that will last a lifetime.